New Azure Portal


Couple of months back in Build Microsoft announced and showed the new Azure Portal. It’s still in preview. As probably everyone knows by now, the new portal focuses on apps or shows an app centric view rather than resources. So for example if you have a Azure WebSite backed by SQL database and Service Bus, in the old portal you need to go to different tabs to figure out different resources used by your app and join the dots mentally to understand the complete picture.

In the new portal, you would get a app centric view – it would show and link up different resources or Azure services used by your app and then you can drill down to each services. The URL of the new Azure portal is https://portal.azure.com/

Surely the initial user experience or the home page is similar to Windows 8 UI constituting of Live tiles. These live tiles are fully customizable. Clicking on any of the tiles allows you to drill down further and shows more detailed information. For example clicking on the Service Health tile opens Service Health blade (Microsoft is calling these drill down view/parts as blades for now, not sure if the naming convention would change later). The Service Health blade shows the status of different Azure Services.

Clicking further on any of these services show even more detailed information. For example clicking on Mobile Services shows health of the Mobile Services in different regions –

Another major improvement in the Portal is around billing. While working with developers and customers on Azure projects, I heard a common feedback from most around billing. Rather around information about billing. The old portal does not show up any billing info and you need to visit the Microsoft Account page to know about billing. Microsoft surely heard the feedback and has integrated billing information in the new portal.

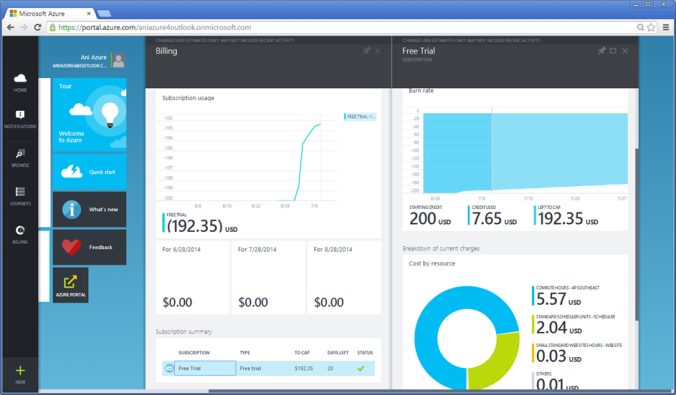
So just below the Service Health tile in the home page is the billing tile which shows the plan, current credit and other important info. Clicking on this allows you to further drill down –

The Billing blade shows the current usage, credit left and last 3 months billing. Since I am using the Free trial the values for last 3 months bill are 0. Clicking on the Subscription Summary shows the all the Subscription Details like Burn rate, and breakdown by each resource. As you can see most of my credit is spent in compute hours of cloud service J

I have been exploring the new portal for couple of months now and I really liked the idea. I would blog about few more features in upcoming blog posts.

TextMode property in TextBox now supports new HTML5 controls


ASP.NET 4.5 has great support for HTML5. Starting with ASP.NET 4.5, TextMode property of TextBox control supports new HTML5 input types like email, datetime, and so on.

Following code snippet shows how to use some of these TextMode properties –

Most of the modern browsers have better support for these HTML 5 controls. Below is how Chrome displays some of these HTML 5 controls –

ASP.NET converts the TextMode property appropriately to type property of input tag –

<div>

<h5>Color:</h5>

<input name=”TextBox1″ type=”color” id=”TextBox1″ /><br/>

<h5>Date:</h5>

<input name=”TextBox2″ type=”date” id=”TextBox2″ /><br/>

<h5>Datetime:</h5>

<input name=”TextBox3″ type=”datetime” id=”TextBox3″ /><br/>

<h5>Month:</h5>

<input name=”TextBox4″ type=”month” id=”TextBox4″ /><br/>

<h5>Range:</h5>

<input name=”TextBox5″ type=”range” id=”TextBox5″ /><br/>

<h5>Email:</h5>

<input name=”TextBox6″ type=”email” id=”TextBox6″ /><br/>

</div>

Notification Center in Visual Studio 2013


Visual Studio 2013 has a feature to display notifications. The Visual Studio title bar now shows a notification (flag) icon.


Clicking the Notification icon on the title bar shows the notifications area and all the notifications. As of now it’s not possible to customize this or add any third party integration (like showing custom notifications).

Visual Studio Development Server discontinued in the Visual Studio 2013 Preview


I have been making my hands dirty with the Visual Studio 2013 Preview version and ASP.NET 4.5.1 for some time now. While there are quite a large number of new features introduced in ASP.NET, one feature that got dropped almost silently is the Visual Studio Development Server (Cassini).

While Visual Studio Development Server was a legacy web server used for development purpose, Microsoft later introduced IIS Express which kind of serves the same purpose. Visual Studio 2012 had the IIS Express as default web server, though it continued support for Visual Studio Development Server – it was possible to use Visual Studio Development Server to host the ASP.NET web application.

Visual Studio 2012:

Visual Studio 2013 preview now no longer supports Visual Studio Development Server (Cassini) – it supports only IIS, IIS Express or External Host.

Visual Studio 2013 Preview:

While this is a small change, it’s worth mentioning for all the ASP.NET long timers. In future blog posts I would cover some of the new features of ASP.NET 4.5.1

Microsoft may support Linux on Windows Azure cloud


It seems Microsoft is really trying hard to open-up Windows Azure to make it multi-platform enabled and not to bind it with .NET or only Microsoft stack. Mary Jo recently reported so in her blog post “Microsoft to enable Linux on its Windows Azure cloud in 2012”.

This is surely a big move – if this article is to be believed, then Microsoft would allow customers to upload Linux VM roles. Though some of the analysts mentioned that Microsoft was forced to made this decision as many of their customers are demanding Linux support on Windows Azure as a key decision point for choosing Azure in a separate Zdnet Blog post.

Till now, Microsoft had limited support for Java, PHP and Eclipse on Windows Azure – though it was not as feature rich as .NET and Visual Studio. Recently they also extended support for node.js and MongoDB.

But this was all in app tier, the OS was always Windows Server 2008 / R2, which as per the report Microsoft is planning to open up.

This is inline with Microsoft’s stance on opening up their Web stack to a certain extent.

New Zip Archive Features in .NET 4.5 BCL


One of the long awaited features in .NET Framework was better support for Zip/archiving. Folks have used third part APIs (most of them are COM API) or Windows COM API to perform zipping, which needless to say has it’s own challenges.

.NET BCL has a namespace called System.IO.Compression (they are part of system assembly) which till .NET 4.0 had two classes –

  • DeflateStream
  • GZipStream

Both these classes derive from System.IO.Stream class and mainly provide only one type of compression format, which is Deflate. Read this old .NET BCL blog post to know more about System.IO.Compression capabilities.

Now with .NET 4.5, BCL contains a new assembly called System.IO.Compression. You can add a reference to the new assembly using Add Project Reference dialog –

This new assembly contains new classes that provides zip archiving features. These classes are called ZipArchive and ZipArchiveEntry. Both the classes are present in System.IO.Compression Namespace. To use these classes add a using statement in your class file –

using System.IO.Compression;

ZipArchive is the main class that provides zip archiving features – it’s also the entry point into the new API. We would discuss about this class first.

ZipArchive class contains two static methods – ExtractDoDirectory and CreateFromDirectory to handle two of the most used scenarios/use cases –

  • ExtractToDirectory extracts all the contents of a zip archive to the specified directory
  • CreateFromDirectory takes the contents of the directory and zips it’s content to a zip file

Let’s see examples of both. I have a zip file called MyArchive.zip in C:\Aniruddha\Test\ folder. The zip contains documents of different type –

Let’s try to unzip MyArchive.zip using ExtractToDirectory method of ZipArchive class –

string archiveFilePath = @”C:\Aniruddha\Test\MyArchive.zip”;

string destinationDirectory = @”C:\Aniruddha\Test\Extracted”;


// Pass the zip file location and destinationDirectory to ExtractToDirectory method

ZipArchive.ExtractToDirectory(archiveFilePath, destinationDirectory);


Once this code is run, you’ll find all the contents of zipped file are extracted into Extracted subfolder – if the directory does not exist it would get created.

string destinationArchiveFilePath = @”C:\Aniruddha\Test\MyArchive.zip”;

string sourceDirectory = @”C:\Aniruddha\Test\Source”;


// Pass the source directory and destination archive file path

ZipArchive.CreateFromDirectory(sourceDirectory, destinationArchiveFilePath);


For more sophisticated manipulations of Zip archives, there are two main classes. ZipArchive represents a zip archive, which is a collection of entries, and ZipArchiveEntry represents an archived file entry.

A ZipArchive class (representing a zip file ) can have one or more ZipArchiveEntry class (representing normal files like text file, doc file, pdf file etc) –


string archiveFilePath = @”C:\Aniruddha\Test\MyArchive.zip”;

string sourceFilePath = @”C:\Aniruddha\Test\Test.txt”;


// Create a new ZipArchive specifying zip file location and Archive mode

// Since the archive is created for the first time mode is set as create

// Mode enum value could also be Read and Update

using (ZipArchive archive = new
ZipArchive(archiveFilePath, ZipArchiveMode.Create))

{

// Create the Zip Archive passing an existing file location, file entry name in archive and compression level

// file entry name within archieve file could be different from the original file name

// Compression level could be fastest, no compression and optimal

ZipArchiveEntry archiveEntry = archive.CreateEntryFromFile(sourceFilePath, “Test.txt”, CompressionLevel.Optimal);

}


Note: Dispose has to be called on ZipArchive – either explicitly or implicitly through C# using – if you do not call Dispose the zip archive would not be correctly created. Also since the ZipArchive and related classes internally use unmanaged classes if you do not call Dispose there would be chances of memory issues.

It’s also possible to zip multiple files from different locations using ZipArchiveEntry class. Let’s see an example –

string archiveFilePath = @”C:\Aniruddha\Test\MyArchive.zip”;


string sourceFilePath1 = @”C:\Aniruddha\Test\Test.txt”;

string sourceFilePath2 = @”C:\Articles.docx”;

string sourceFilePath3 = @”C:\CIO_Work\Resume.pdf”;


// Create a new ZipArchive specifying zip file location and Archive mode

// Since the archive is created for the first time mode is set as create

// Mode enum value could also be Read and Update

using (ZipArchive archive = new
ZipArchive(archiveFilePath, ZipArchiveMode.Create))

{

// Create the Zip Archive passing an existing file location, file entry name in archive and compression level

// file entry name within archieve file could be different from the original file name

// Compression level could be fastest, no compression and optimal

ZipArchiveEntry archiveEntry1 = archive.CreateEntryFromFile(sourceFilePath1, Path.GetFileName(sourceFilePath1), CompressionLevel.Optimal);


ZipArchiveEntry archiveEntry2 = archive.CreateEntryFromFile(sourceFilePath2, Path.GetFileName(sourceFilePath2), CompressionLevel.Optimal);

ZipArchiveEntry archiveEntry3 = archive.CreateEntryFromFile(sourceFilePath3, Path.GetFileName(sourceFilePath3), CompressionLevel.Optimal);

}

Using the ZipArchiveEntry class individual file entries of a zip archive can be listed. It provides properties like Name, LastWriteTime, Length (indicates the original file length), CompressedLength.

using (ZipArchive archive = new
ZipArchive(archiveFilePath, ZipArchiveMode.Read))

{


Console.WriteLine(“Name\t\t Size \t Last Write Time\t Comp. Size\t Comp. Ratio”);


foreach (ZipArchiveEntry archiveEntry in archive.Entries)

{

    Console.WriteLine(“{0}\t {1} KB\t {2}\t {3} KB\t {4}\t”, archiveEntry.Name,

archiveEntry.Length / 1024,

archiveEntry.LastWriteTime.ToString(“dd-mm-yyyy hh:mm:ss”), archiveEntry.CompressedLength / 1024,

((double)archiveEntry.CompressedLength / archiveEntry.Length));

}

}


Refer the following MSDN BCL team blogs related the zip feature in .NET 4.5 BCL – http://blogs.msdn.com/b/bclteam/archive/tags/zip/

Happy Learning .NET 4.5 & VS 11!

Web Platform Installer 3.0


I have been using the Microsoft Web Platform Installer or PI for a while now. It’s a great handy tool for ensuring that I have all the latest bits of Web platform tools like MVC, Web Matrix are installed. One of the other thing I like about Web Platform Installer is that the tool can self update itself. When a new version of the tool is released, it shows a dialog box to the user to install the latest version of the tool.

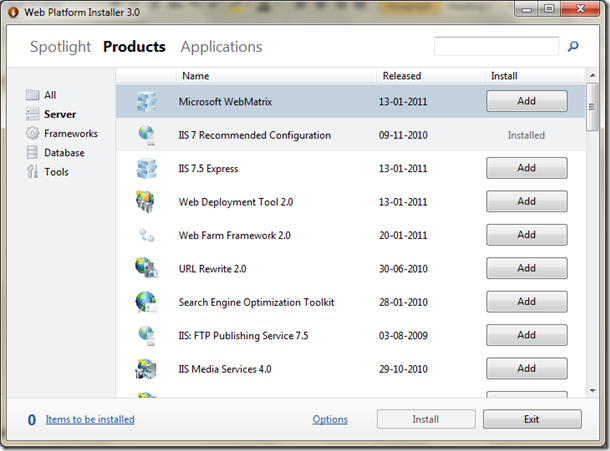
Recently I installed the PI version 3.0

image

Apart from the Spotlight tab showing the recent released, as usual the Products tab shows all the products. It can also the filtered into different category of downloads like Server, Framework, Tools etc.

image 

I hope some day Microsoft would release a same type of tool for Windows developers also!

File.GetLastWriteTime does not throw an exception if the file does not exist


Lately I have been working in performance engineering and improvement of a big and complex enterprise class product for financial market. Typical to any product or app for financial market, this product also has to deal with high volume of data – so every second (actually millisecond) counts. While profiling the App with Ants Profiler I saw that one of the methods which is costly is spending considerable amount of time in .NET API File.Exists method. The method actually gets the last write time of a file using File.GetLastWriteTime(filePath) but before that it checks whether the file exists through File.Exists. The reason is to make sure to call File.GetLastWriteTime only when File exists so that it does not throw exception. Following was the code used –

 image

So as I started looking I thought to check whether the assumption of using File.Exists is correct. To my surprise I found in MSDN that File.GetLastWriteTime does not throw an exception in case the file does not exist.

If the file described in the path parameter does not exist, this method returns 12:00 midnight, January 1, 1601 A.D. (C.E.) Coordinated Universal Time (UTC), adjusted to local time.

So I re-wrote the code in the following way and was able to remove the call to File.Exists method which was costly –

image

Note that I had to compare the time in UTC as File.GetLastWriteTime returns 12:00 midnight, January 1, 1601 A.D. in UTC time.

Over the next few blog entries I would share some more performance improvement tricks. Happy Profiling!

ASP.NET 4 Chart Control


One of the best new feature of ASP.NET 4.0 Web Form (yes it’s still alive) is the new Chart control. There have been a need for a Chart control for a long time – from version 1.0. Folks have used custom controls from various sources or written their own one. Now in ASP.NET 4.0 Microsoft have introduced a Chart control ultimately. This could be used in ASP.NET MVC also apart from Web Forms.

The Chart control provides all different type of charts like Column, Bar, Line, Area, Pie, Doughnut (to name a few). Following is an example of Chart with chart type Column.

image

To set up a basic chart control you have to set a few properties like XValueMember and  YValueMembers. In the example I have displayed the Total Sales figure for few cities. Following is the page markup –

image

As you can see I’ve set XValueMemeber to City and YValueMembers to TotalSales – both of them are properties in my DTO –

image

The chart type could be set in markup or through code for the series –

image

chtSalesData.Series[“Series1”].ChartType = System.Web.UI.DataVisualization.Charting.SeriesChartType.Bar;

image         image   

image         image